In today’s woodworking landscape, lumber drying remains an essential element for craftspersons and industry professionals alike. Efficient wood drying ensures the longevity and quality of wood products. This guide explores the concept of creating a DIY workshop dehumidifier kiln, a practical solution for those seeking to dry lumber effectively within a personal workshop setting.

Table of Contents
Understanding the Importance of Lumber Drying
- Lumber drying is vital because wood is hygroscopic, meaning it absorbs or releases moisture to balance with the surrounding air. Incorrectly dried lumber can lead to structural weaknesses and aesthetic flaws.
- Lumber drying must reduce moisture content to a stable level to prevent defects such as warping or cracking. Read more
- If lumber is not dried correctly, it can end up with serious structural issues: warping, cracking, twisting, or checks, all resulting from uneven moisture content. These flaws not only compromise strength and stability but also mar its appearance, leading to misalignment in framing, gaps in flooring, and weakened joints .
- Drying lumber reduces its moisture content to a level that aligns with its intended use and environment. For indoor applications, this typically means dropping to about 6–8% moisture content, which significantly enhances dimensional stability, prevents further shrinkage, and minimizes the risk of biological decay.
Proper kiln-drying or controlled dehumidification ensures that moisture is removed at a steady rate allowing the wood’s internal and external layers to dry uniformly. This avoids internal stresses and guarantees that the lumber dries to a safe, stable equilibrium moisture content (EMC); failure to maintain this balance can lead to internal tension known as case-hardening which may result in structural failure or severe warping when the wood is later machined or installed.
In summary, accurate lumber drying is essential. It transforms green lumber into strong, attractive, and reliable material safe from moisture-induced defects and ready for use in construction, furniture, or flooring.
How to DIY a Humidification Kiln
By adding controlled moisture again, a humidification kiln is perfect for conditioning case-hardened or excessively dry lumber. Below mentioned points must be taken into consideration:
- A small space heater should be placed inside the chamber to keep the temperature between 90°F and 120°F.
- Depending on the desired moisture level, add a steam generator, ultrasonic mister, or home humidifier to raise the relative humidity to between 60 and 80%.
- In order to distribute warm, humid air evenly throughout the stacked lumber, a fan should also be installed. To guarantee uniform airflow, place spacers (stickers) in between each board.
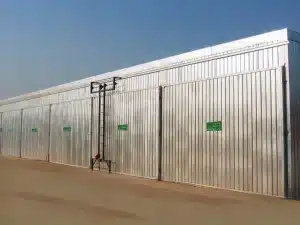
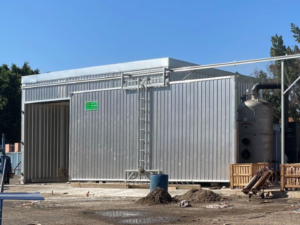
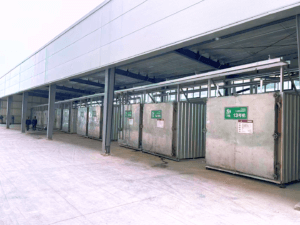
Step-by-Step Guide to Build a DIY Dehumidifier Kiln
This section explains how to build a functional wood drying kiln using a household dehumidifier.
Step 1: Determine the Kiln Size and Design
Decide:
- Quantity of wood (board feet)
- Longest lumber dimensions
- Available workshop space
Common Sizes are listed below:
- Small: 4′ x 4′ x 4′
- Medium: 8′ x 4′ x 6′
Design Notes:
- Rectangular box with insulated walls
- Tight-sealing access door
- Adequate space for air circulation and monitoring
Step 2: Build the Kiln Frame
Material Required:
- 2×4 or 2×3 lumber
- Exterior plywood/OSB
Instructions:
- Build raised base
- Construct box frame (16″ or 24″ stud spacing)
- Install wall, floor, and roof panels
- Add a tightly sealed hinged door
TIP: Use screws for easier adjustments.
Step 3: Add Insulation and Vapor Barrier
Materials:
- Rigid foam board (1.5″–2″)
- Reflective foil (optional)
- 6 mil+ plastic sheeting
- Aluminum tape
Instructions:
- Line walls with foam board
- Seal with aluminum tape
- Cover with vapor barrier
- Optional: Add foil for extra heat retention
Avoid fiberglass—it absorbs moisture.
Step 4: Install Climate Control Components
Heat Source:
- Small ceramic/oil heater with thermostat
Dehumidifier:
- 30–50 pint model with drain hose
- No auto shut-off
Fans:
- One horizontal, one vertical or looping
- Ensure continuous airflow
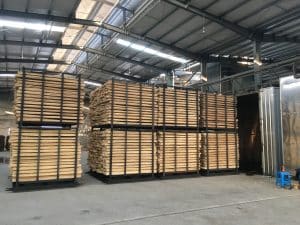
Step 5: Prepare the Lumber Stack
Before loading:
- Seal board ends to prevent splits
- Sticker stack every 16–24″
Inside kiln:
- Raise stack off the floor
- Leave 12″ of airflow clearance
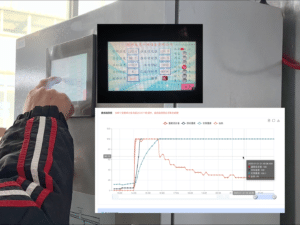
Step 6: Add Monitoring Equipment
Devices:
- Hygrometer (humidity)
- Thermometer (temperature)
- Moisture meter (manual)
Placement:
- Mid-height, center of stack
- Monitor daily
Targets:
- Temp: 90–120°F (32–49°C)
- Humidity: Gradually reduce from 60% to ~30%
Step 7: Seal and Test the Kiln
Pre-check:
- Seal edges with weatherstripping
- Check for leaks and seal with tape or caulk
- Run for 24 hours to verify climate control
Step 8: Begin the Drying Process
- Load lumber
- Close tightly
- Start heater, fans, dehumidifier
Monitor:
- Weekly moisture checks
- Adjust slowly for hardwoods
- Avoid rapid humidity/heat changes
Optional: Add Humidification Feature
For dense hardwoods or conditioning:
- Add cool-mist humidifier or fogger
- Control with humidistat (60–70% RH)
- Reduces case-hardening and uneven drying
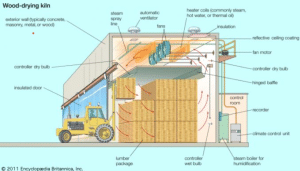
Fundamentals of a Dehumidifier Kiln
A dehumidifier kiln involves using a dehumidifier to extract moisture from wood. Unlike conventional kilns that use high heat, dehumidifier kilns operate at moderate temperatures. The precision in moisture removal provides a controlled environment for drying lumber, reducing the risks of overdrying or surface checks.
Building Materials and Tools Required
Before embarking on your build, gather these essential materials and tools:
Material | Quantity |
Dehumidifier | 1 unit |
Insulation Panels | Enough to line the chamber |
Wood (for chamber) | Depends on desired kiln size |
Plastic Sheeting | For lining walls |
Thermometer and Hygrometer | 1 each |
Comparative Analysis: Commercial vs. DIY Kilns
Here’s a quick comparative analysis:
Aspect | Commercial Kiln | DIY Kiln |
Cost | Higher due to advanced technology | Lower, as it involves basic tools |
Customization | Limited to manufacturers’ settings | Highly customizable to user needs |
Energy Efficiency | Generally energy-intensive | Energy efficient with proper insulation |
Future Prospects of DIY Dehumidifier Kilns
The future of DIY dehumidifier kilns appears promising with trends toward sustainability and cost-effectiveness. Globally, there’s a growing emphasis on reducing carbon footprints and promoting sustainable practices. DIY kilns align well with these trends due to their low energy consumption and environmentally friendly operation.
DIY dehumidifier kilns offer a cost-effective, energy-efficient, and customizable option for lumber drying. Despite the challenges in building and operating these systems, their benefits greatly outweigh the constraints, particularly for hobbyists and small-scale woodworkers. Contact us for more details.
Frequently Asked Questions
What are the main benefits of using a DIY dehumidifier kiln for lumber drying?
A DIY dehumidifier kiln provides several advantages, such as cost savings, energy efficiency, and customization tailored to specific lumber drying needs. Unlike traditional kilns that require substantial energy input due to high temperatures, dehumidifier kilns operate efficiently with moderate temperatures and controlled moisture removal. This ensures minimal risks of wood defects such as warping or cracking. Additionally, the DIY approach allows woodworkers to customize the lumber dryin kiln to accommodate different wood species and project sizes, making it a versatile solution for personal and small-scale operations.
How does a dehumidifier kiln compare to conventional kilns?
Dehumidifier kilns differ from conventional kilns primarily in their drying mechanism. While conventional kilns rely on high heat and airflow to evaporate moisture, dehumidifier kilns use a closed, controlled environment where a dehumidifier actively removes moisture from the air. This process is generally more energy-efficient and reduces the likelihood of overdrying. Moreover, the slower lumber drying drying process in dehumidifier kilns often results in higher-quality lumber with fewer defects, making them suitable for precision work.
What materials do I need to build a DIY dehumidifier kiln?
To construct a DIY dehumidifier kiln, you’ll need several key materials: a reliable dehumidifier, insulation panels, wood for building the frame, and plastic sheeting to line the walls. Instrumentation, such as thermometers and hygrometers, is also necessary to monitor temperature and humidity levels within the kiln. These materials can all be sourced relatively easily and are essential in ensuring a well-insulated and efficient kiln capable of drying different types of lumber to the desired moisture content.
How long does the drying process take in a DIY dehumidifier kiln?
The drying time in a DIY dehumidifier kiln can vary based on factors such as wood species, thickness, and initial moisture content. Typically, drying times can range from a few weeks to several months. For example, thinner boards and softwoods may dry out more quickly, while thicker hardwoods might require extended durations. It’s crucial to monitor moisture levels consistently during the process to ensure that the wood reaches the ideal moisture content without the risk of defects resulting from too rapid or uneven drying.
What are the challenges faced when building a DIY dehumidifier kiln?
When constructing a DIY dehumidifier kiln, challenges may arise, such as achieving precision in the kiln’s construction to avoid air leaks that could compromise drying efficiency. Another challenge is ensuring consistent temperature and humidity monitoring to prevent defects like warping or splitting. Additionally, adequate space within a workshop is crucial, as a larger kiln might not be feasible in small or cramped areas. Despite these challenges, with proper planning and materials, building an effective DIY kiln is achievable and can significantly enhance one’s woodworking capabilities.